Accepted File Types
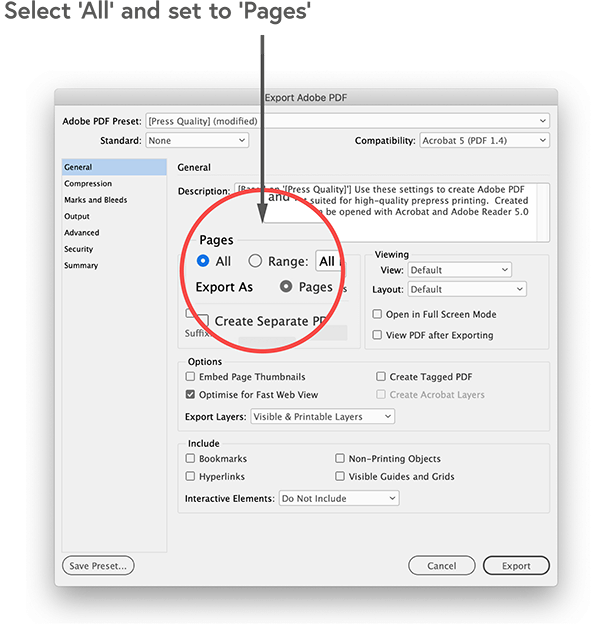
Mixam's online system lets you convert many file types into high-quality print files. We still convert the files to PDFs, but you can submit them as single pages, double pages or separate files for each project.
|
File Type Conversion |
|||
|---|---|---|---|
|
DOC Files Types to PDF |
Image File Formats to PDF |
eBook File Formats to PDF |
CAD File Formats to PDF |
| .csv, .djvu, .doc, .docx, .eml, .eps, .key, .key.zip, .mpp, .msg, .numbers, .numbers.zip, .odp, .ods, .odt, .pages, .pages.zip, .pps, .ppsx, .ppt, .pptx, .ps, .pub, .rtf, .txt, .vsd, .vsdx, .wks, .wpd, .wps, .xlr, .xls, .xlsx, .xps | .3fr, .ai, .arw, .bmp, .cdr, .cr2, .crw, .dng, .emf, .erf, .gif, .heic, .jpg, .jpeg, .mdi, .mef, .mrw, .nef, .odg, .orf, .pcx, .pef, .png, .ppm, .psd, .raf, .raw, .sr2, .svg, .tga, .tif, .tiff, .wbmp, .webp, .wmf, .x3f, .xcf | .azw, .azw3, .cbc, .cbr, .cbz, .chm, .epub, .fb2, .lit, .lrf, .mobi, .pdb, .pml, .prc, .rb, .tcr | .dwg, .dxf |
Simple File Formats
If you plan to print a two-sided item like Posters or Flyers, you only need to upload a multi-page file. Alternatively, you can upload a separate file for each side. Just ensure the alignment of both files is the same (Portrait or Landscape).

Saddle-Stitched File Formats
Say you wanted to print a saddle-stitched (staple-bound) Booklets. You can submit one multi-page print file. The first page should be your front cover; the second should be your inside front cover, and so on. The last page will be your back cover.
You can also submit a separate file for each page or a double-page spread. Once you have uploaded all your files, you can rearrange the page order by dragging the thumbnail to its new position - no other online printing platform offers this!
If you name your files by their position (e.g. Page4, Page_4, etc.), our system automatically puts them in order.

Wiro-Bound File Formats
Just like a saddle-stitched format, if you're printing wiro-bound Booklets, you may submit a single file with all pages in the order you want them to appear in print. Again, start with the front cover and end with the back cover.
We also accept separate files for each page and double-page spreads for this format.

Perfect Bound and Paperback File Formats
You may want to add a spine to your cover design, and there are two ways to do this. You can either:
- Upload a double-page spread design that includes your front cover, spine file and back cover, or
- Upload a separate spine file in addition to your cover design.
The Spine Calculator in your Shopping Cart will give you the dimensions for your spine file. Since you need to upload a separate file for perfect bound book covers, the rest of your files should begin with the first interior page and end with the last page before the back cover.
You can name the spine file clearly so our system can place it correctly, and if you upload a separate file, remember to add bleed.

Hardcover Book File Formats
You need to upload a spine with your cover design. Keep in mind that the cover pages for Hardcover Books have considerably larger bleed areas than those of the interior pages. You will need to include a 20mm bleed for the cover design to wrap around the sides of the book board.
Hardcover designs can be challenging, so please download a template to set your cover design correctly.

How do I submit my files?
Once our Instant Price Calculator gives you a FREE quote with an estimated delivery date, select a quote > Add to Cart > click Proceed and upload files to enter your Artwork Dashboard.
Please note our system may rearrange your page order every time you upload a file. You can drag and drop files from your desktop or upload them from your computer, your Dropbox or WeTransfer account, or even a web URL.
If you choose to upload several files, label files in the order you want them to appear, and our system will place all your pages in the correct order. You can use words like the front, back and last in place of numbers, if you prefer.

How To Remove Print Files
Deleting print files from your Artwork tab is simple. You can either:
Delete from the Files Section:
- Locate the blue Files box on the left-hand side of your screen.
- Click the red cross next to the file you want to delete.
Delete Files from Pages:
- Locate the blue, three-dotted icon beneath the page with the artwork you want to remove.
- Click on the icon and select 'Delete' (look for the bin/trash icon).
- Confirm the deletion when prompted. This will remove the artwork but not the page itself.
Delete All Files:
- Locate the bin icon above your artwork
- Click the button to clear all uploaded files in your pending order.
Note: Before reuploading artwork files, remove existing artwork files to ensure the new files are uploaded correctly. Once reuploaded, please check to ensure your page sequence is correct.
